October 12, 2015

Caramel Apple Pie Bars

Caramel Apple Pie Bars

It's fall! It's fall, it's fall, it's fall!! And okay, it's about 100 degrees here today, and we probably won't have fall like temperatures until late November, but I'm still celebrating with all the apples and all the pumpkins.

Apple Pie Bars with Caramel

Last weekend we went to Apple Hill, which is a really cool area full of orchards and vineyards. And a ton of people in October. We went to a couple of the more out of the way places (much more our speed and much less crowded), and I stocked up on apples.

Caramel Apple Pie Bars

And stared at some delicious looking caramel apples--my problem with caramel apples is I can never eat an entire one and I normally manage to get it all over myself while eating it... So I skipped the caramel apple and decided to turn some of my apples into a dessert.

Caramel Apple Pie Bars

A caramel apple crumble pie bar dessert. An apple pie bar dessert with caramel? A caramel apple tart? With crumbles? Haha! This recipe is a mash up of apple pie, caramel apples, and a pie bar. And it's topped with a delicious crunchy crumble and drizzled with more caramel sauce--in other words, it's unholy deliciousness!

Apple Pie Bars with Crumble Topping

It is a couple of steps--but I think it's totally worth it in the end! I put the steps in the recipe in the order I did them and when the caramel apple crumble bars came out the oven I had to resist eating them right then and there! These bars would be perfect with vanilla ice cream, but they're also good all by themselves!

Caramel Apple Pie Bars with Crumble Topping

Caramel Apple Pie Bars Recipe
author: Happy Food Happy Home
makes 16-20 2x2 inch bar pieces

Crust
1 pie crust
  1. Heat oven to 350 degrees. 
  2. Line a 9" x 13" rimmed baking sheet or casserole pan with parchment paper. 
  3. On a floured surface, roll out the pie crust into a 9" x 13" rectangle. Carefully transfer the dough rectangle to the baking sheet. 
  4. Prick the dough all over with a fork. 
  5. Bake the dough for 10 minutes until the edges are firm, but the dough has not yet turned golden. 
  6. Remove from the oven and set aside. 

Caramel Sauce
*makes more sauce than you'll need for the bars. It's really nothing to complain about ;)

1 cup granulated sugar
2 teaspoons light corn syrup
6 tablespoons unsalted butter
1/2 cup heavy cream
1 teaspoon vanilla extract
pinch of kosher salt
  1. In a medium sauce pan, add the sugar and corn syrup. 
  2. Bring to a boil over high heat swirling occasionally until all the sugar has dissolved, about 5 minutes.  
  3. Remove the sugar from the heat and carefully add the butter. The mixture will bubble! Be careful! Stir until the butter has melted. 
  4. Still off the heat, add the heavy cream and vanilla. It will bubble again! Be careful!
  5. Put the mixture back on the stove over medium high heat.  Stir the mixture until it all comes together.
  6. Cook for 2-3 minutes more until it becomes a delicious caramel color! Remove from heat and pour into a heat proof glass jar. 
  7. Set caramel sauce aside. 

Crumbles
3/4 cup of all purpose flour
1/2 teaspoon salt
1/2 teaspoon cinnamon
3 tablespoons brown sugar
1/2 teaspoon baking powder
4 tablespoons unsalted butter, melted
  1. In a medium bowl, mix together the flour, salt, cinnamon, brown sugar, and baking powder. 
  2. Drizzle with the melted butter and mix together to form small crumbles. 
  3. Set aside. 

Apples
3-4 medium apples
1/2 teaspoon cinnamon
squeeze of lemon juice (about 1/2 teaspoon)
1 teaspoon corn starch
  1. Peel the apples. Quarter them and cut out the cores.  Evenly slice the apples to about 1/4 inch thickness. 
  2. Toss the apple slices with the cinnamon, lemon juice, and corn starch. 

To Assemble and Bake
1 par-baked pie crust
apple slices
1/4-1/2 cup caramel sauce
crumbles
plus more caramel sauce for topping

  1. Heat oven to 350 degrees. 
  2. On top of the pie crust (still on the parchment lined cookie sheet) lay the apples in rows, overlapping each piece 3/4 of the way.
  3. Drizzle the apples with a light layer of caramel sauce. 
  4. Evenly spread the crumbles over the top of the caramel drizzled apples.
  5. Bake the bars at 350 degrees for 30-45 minutes until the apples are soft and the tops of the crumbles are golden brown. 
  6. Allow the caramel apple crumble bars to cool for about 30 minutes before drizzling with more caramel sauce and slicing. (I used a pizza cutter to slice between my rows of apples, then cut each row into four pieces.)
The bars will keep for about a week in an airtight container in the refrigerator, but it's best to eat them the day of so the crumble stays crunchy!

Enjoy your caramel apple pie bars with ice cream, apple cider, or just all by themselves. Pack some up and go on a picnic to an apple orchard near you! Yay fall! 


October 2, 2015

We Moved to Sacramento!

In March of this year, Dustin interviewed for a job in Sacramento.  That particular position didn't quite match up with what we wanted, so we settled in to our lives in Indiana and moved on.

Our new house!
Until early May, when the company called back. They offered a different position that seems like a perfect fit for Dustin's experience and personality. And so, we sold our house, packed up everything, and at the beginning of July moved across the country to Sacramento!

Cheese boards are a food group, right?

It has been a super exiting (and rather dramatic) couple of months, but we're settling into Sacramento! We were looking for an apartment that would fit our needs and be in our budget.  It was a long process and for a while it seemed like nothing would work out. Thankfully we found an awesome house that is right outside the city.

At a FREE Farm-to-Fork Block Party!

Our belongings were delayed by a month getting here, so we moved into our house with the things we had packed to bring with us for a week. No furniture, no things to cook with or eat off of, no cleaning supplies, no nothing. Luckily we had planned to buy a new bed when we got here, so we didn't sleep on the floor for a month! And Ikea is 5 minutes away from us, so we were able to buy lots of Ikea goodies to make it through!

My reward for finishing my real estate courses! 

I've finished my California real estate courses, so as soon as I'm approved to take the test I will be ready to rock and roll with my real estate career! I'm super excited to start helping people buy and sell their homes--real estate hits so many of my personal 'happy spots' that I need from a career.

Beautiful sunset right behind our water tower!

I'm hoping to pick up on my blogging--just for fun and with no real focus... Yay randomness! Follow along if you want--or don't lol. Follow me on Instagram too! Lots of fun pictures over there! 

March 10, 2015

Cheeseburger Soup

Cheeseburger Soup Recipe

I think I first heard the words "Cheeseburger Soup" on an episode of Diners, Drive-Ins, and Dives. I loved watching that show and seeing all the cool places they found to feature. It really made me want to seek out and try new restaurants around me!  And cheeseburger soup?? Who can say no to that?

Real Food Cheeseburger Soup

I'm not really sure what the recipe was on the show, or even what restaurant they were talking about. But I couldn't stop thinking about cheeseburger soup. This soup recipe has become one of our favorites; I love it because it's easy to throw together and I almost always have everything on hand. Dustin loves it because it's cheesy and meaty and absolutely delicious.

Cheeseburger Soup with Tomatoes

I use three kinds of cheese in the soup for extra flavor and cheesy punch. The spices and tomatoes keep this from feeling too much like fondue. And I use ground turkey for the meat because no one can tell the difference! It's also a lean meat that keeps the soup from getting to heavy.

Recipe Cheeseburger Soup

I love serving this soup with pretzel rolls--it's like a hamburger on a pretzel bun! Cheeseburger soup is a delicious soup recipe that I love making. It's easy, filling, and a fast dinner to throw together.


Cheeseburger Soup
author: Happy Food Happy Home
Serves 2-4

2 tablespoons olive oil
1 medium onion, diced
1 garlic clove, minced
1 jalapeno, minced
1 pound ground turkey
1 tablespoon chili powder
1 teaspoon paprika
1 (14 ounce) can diced tomatoes
2 cups chicken broth
salt and pepper
1 teaspoon oregano
½ teaspoon ground mustard
1 bay leaf
1/2 cup shredded Colby Jack cheese (shredded from a block, not pre-shredded!*)
1 ½ teaspoons corn starch
¼ cup (1/2 block) cream cheese
2 slices American cheese
  1. Heat the olive oil over medium heat in the bottom of your favorite soup pot.
  2. Add the onion to the pot and cook until softened, approx 5 minutes. 
  3. Add the jalapeno and the garlic to the onions and cook for 1 minute.
  4. Add ground turkey and season with salt and pepper.  Cook until browned, about 10 minutes.
  5. Add in the chili powder and paprika, and toast with the ground turkey for 30 seconds. 
  6. Add the chicken broth, tomatoes, oregano, ground mustard, and bay leaf.  Allow soup to come to a simmer.
  7. Cut cream cheese into small chunks and stir into the soup.
  8. Meanwhile, shred the Colby Jack cheese and toss with the corn starch.
  9. Add the shredded cheese and corn starch mixture to the pot.  Stir until the cheese has melted and incorporated into the soup. 
  10. Add the American cheese slices and stir until melted. 
  11. Ladle in to bowls and serve with yummy crusty bread or pretzel crackers. 
*Because pre-shredded cheese has a non-caking agent added to it, it often doesn't melt into the soup correctly.

Cheeseburger Soup Recipe

You should definitely give cheeseburger soup a try. I bet it will become a favorite meal in your house, especially if you love soup and cheese!

Are you following along?? Follow me on Pinterest, Instagram, or Google+

March 5, 2015

Quadruple Chocolate Chocolate Chip Cookies

Double Chocolate Chip Cookie Stack

Sometimes when I get home from teaching, I need a cookie. Or 5..sometimes 5 cookies. And last week was one of the 5 cookies kind of weeks. Luckily, by the time I nibbled on the batter making these cookies, I only had two instead of five. A

Double Chocolate Chip Cookie with Three Kinds of Chocolate Chips

Double chocolate chip cookies are some of my favorites, and I've been known to order them from anywhere. Subway anyone? And so I set out to recreate the soft chewy centers of my favorite double chocolate chip cookies.  But I also had to raise the bar a little a lot.

Quadruple Chocolate Chip Cookies

So for these cookies, I added three different kinds of chocolate chips--dark chocolate, semisweet chocolate, and white chocolate. The different chocolate chips add different flavors and textures through the cookies. And I added a hit of espresso powder to the batter to make the coco powder flavor really shine.

Chocolate Chocolate Chip Cookies

Vanilla, butter, salt, coco powder, and three kinds of chocolate chips make these quadruple chocolate chocolate chip cookies the perfect afternoon snack after a stressful day. Add a tall, cold glass of milk, and my day was suddenly looking up. It's amazing what quadruple chocolate chocolate chip cookies can do!

Chocolate Chocolate Chip Cookies

Quadruple Chocolate Chocolate Chip Cookies
Author: Happy Food Happy Home
Yields approx. 20 cookies

1 ¼ sticks butter (10 tablespoons), softened 
1 cup sugar
1 egg
1 ½ teaspoons vanilla extract
½ teaspoon espresso powder
1 cup flour
¼ cup plus 2 tablespoons coco powder
¾ teaspoons baking soda
½ teaspoon kosher salt
¾ cup dark chocolate chips
½ cup semi-sweet chocolate chips
¾ cup white chocolate chips
  1. Preheat oven to 350 degrees. Line a cookie sheet with parchment paper.
  2. Cream butter and sugar together in the bowl of a stand mixer. Scrape down the sides of the bowl.
  3. Add the egg. Mix until just combined. Scrape down sides.
  4. Mix in vanilla and espresso powder. Scrape down sides.
  5. In a large mixing bowl, whisk together the flour, coco powder, baking soda, and salt.
  6. Add half of the dry ingredients to the stand mixer and mix until just combined. Scrape down sides.
  7. Add remaining dry ingredients and all of the chocolate chips. Mix until combined.
  8. Use a 1 ½ tablespoon cookie scoop to scoop cookies onto lined baking sheet.
  9. Bake cookies for 9-10 minutes until the edges are set but the middles are still soft. The cookies should have a few cracks running across their tops. 
  10. Let the cookies cool for 5 minutes on the cookie sheet, then transfer to a cooling rack.
adapted from The Pioneer Woman

Double Chocolate Chip Cookies

Sometimes cookies can make everything better. And I love those times--your problems aren't too big when cookies can fix them. Cookies are my go-to 'had a bad day' food; do you have a comfort food you make during a bad day? If you don't I would highly recommend trying these quadruple chocolate chip cookies!

March 3, 2015

Ham and Leek Scalloped Potatoes

Warm and Creamy Ham and Leek Scalloped Potatoes

Winter has hit Indiana hard these past couple of weeks.  What started out as a very mild winter has taken an abrupt turn--there's about a foot of snow on the ground right now. And all the cold snowy weather has me craving comfort foods again; right when I thought it was safe to start eating salads.

Scalloped Potatoes made with Ham and Leeks

Because I was craving warm and creamy deliciousness, I pulled some of my leftover Christmas ham out of the freezer and started dreaming about how to combine it with potatoes and cheese and warmth. Scalloped potatoes came to mind-maybe because we had eaten them with the ham in the first place.

A slice of Ham and Leek Scalloped Potatoes

So I combined leftover ham, and scalloped potatoes and threw a leek in too for added depth of flavor and a vegetable in this 'casserole'. Add in Gruyere cheese for a salty cheese hit, Colby Jack for creamy, melty, stringy cheese, and layer it all together topped with cream and chicken broth. And this comfort food ham and leek scalloped potatoes really hit the spot--the warm and creamy deliciousness spot!

Creamy Scalloped Potatoes with Ham and Leek

Though the scalloped potatoes may look a little intense--there are lots of layers--the most time consuming part is making sure everything is sliced and shredded. Assembling is super easy, cover the scalloped potatoes with foil, and put in a rather hot oven until the cream has thickened, the potatoes have softened, and the cheese has melted. In other words, until the ham and leek scalloped potatoes are ready to go in your belly!

Ham and Leek Scalloped Potatoes
author: Happy Food Happy Home
serves: 4

Prep Time: 20 minutes
Cook Time: 

1 tablespoon of olive oil
1 medium leek, diced
1 large garlic clove, minced
3 teaspoons fresh herbs--I used rosemary and sage
4 cups thinly sliced potatoes
1/2 cup heavy whipping cream
3/4 teaspoon salt
1/2 teaspoon black pepper
3/4 cup shredded Gruyere cheese
3/4 cup shredded  Colby Jack cheese
1 cup diced ham
1/4 cup chicken broth

  1. Slice the potatoes as thinly as you can. I used the smallest setting on my mandolin. Place the potatoes in a large bowl and cover with water to keep them from browning.
  2. Heat the olive oil in a large skillet over medium heat.
  3. Add the leek to the hot oil and cook until it has softened, about 5 minutes.
  4. Meanwhile, mince the garlic and herbs.
  5. Add the minced garlic and herbs to the pan and cook for 1 minute more.
  6. Preheat your oven to 400 degrees.  Grease an 8x8 baking dish.
  7. Drain the water off of the potatoes.
  8. Add the leek-garlic-herb mixture, the whipping cream, and the salt to the potatoes. Toss to coat.
  9. In the greased baking dish, place 1/3 of the potatoes in an overlapping even layer. Drizzle some of the cream from the bottom of the bowl over the potatoes.
  10. Add ½ of the ham and 1/3 of the shredded cheese in an even layer on top of the potatoes.
  11. Gently pour half of the chicken broth over the layer.
  12. Add another layer of 1/3 of the potatoes. Drizzle with cream mixture.
  13. Top with remaining ham and 1/3 of the cheese.
  14. Add another layer with the remaining potatoes. Pour remaining cream on top.
  15. Gently pour the rest of the chicken broth over the layer.
  16. Top with the remaining cheese.
  17. Cover the baking dish with aluminum foil.
  18. Bake for 45-55 minutes until the potatoes are soft and the cream has thickened.
  19. In the last 10 minutes of cooking time remove the foil to make the cheese on top brown and delicious. 
adapted from Pinch of Yum

Creamy and Delicious Ham and Leek Scalloped Potatoes

The Ham and Leek Scalloped Potatoes will be a perfect way to use up any leftover Easter ham you have. It is also perfect to make any time you are craving a warm and creamy dinner. My only hope is by Easter I'll be eating this because it's delicious, and not because it is still freezing outside... Is it spring in your part of the world yet? I promise to only be a little jealous! 


February 18, 2015

Rosemary Black Pepper Popcorn

Rosemary Black Pepper Popcorn

When I was growing up popcorn was my favorite snack. Throw a bag in the microwave after school, and I was good to go until dinner! And sometimes popcorn was dinner and sometimes it was breakfast too. And don't even get me started with how much popcorn we ate in college!

Popcorn flavored with rosemary, black pepper, and butter

A while ago I stopped buying microwave popcorn, but I love making popcorn on the stove top. It tastes so much better than microwave popcorn, and it's almost as fast.

Popcorn with Rosemary and Black Pepper

And while the popcorn is popping I love melting butter and adding seasonings to flavor the popcorn. I love adding flavors and combinations to spice up popcorn. Here rosemary and black pepper combine with melted butter to add depth.

Rosemary Black Pepper Popcorn

Rosemary is such a great addition to popcorn and black pepper adds another hit of flavor to punch up the popcorn. Salt and butter tie it all together, and you just can't stop eating the rosemary black pepper popcorn! I love trying new flavors, and now I can't stop adding things to popcorn!

Rosemary Black Pepper Popcorn

Rosemary Black Pepper Popcorn
Author: Happy Food Happy Home
Serves: 1-2

1 tablespoon coconut oil
¼ cup popcorn kernels

2 tablespoons salted butter
1 teaspoon chopped rosemary
1 teaspoon black pepper

Kosher salt to taste
  1. Heat coconut oil* over medium high heat in a medium sauce pan with a lid.
  2. Heat the oil until it bubbles around a popcorn kernel dropped in.
  3. Add the popcorn to the hot oil. Toss around in the oil to coat.
  4. Toss the kernels every minute or so until the popcorn is fully popped—when the pauses between the pops are longer than 10 seconds and few kernels remain the pot. Remove from heat.
  5. Combine the butter, rosemary, and pepper in a glass measuring cup.
  6. Microwave for 20 seconds, stir, and microwave for 10 more seconds until the butter is melted.
  7. Add half the popcorn to a large bowl. 
  8. Drizzle half of the butter mixture over the popcorn. Sprinkle a pinch of kosher salt over the popcorn. Use a spoon to toss together.
  9. Add the remaining popcorn, drizzle with remaining butter, and sprinkle with more salt. Toss to combine.
  10. Eat and enjoy!!
*You can use vegetable oil in place of the coconut oil

Rosemary Black Pepper Popcorn

I still love to eat popcorn, and probably eat too much of it! But changing the flavors I add to popcorn makes it a super delicious treat!


February 16, 2015

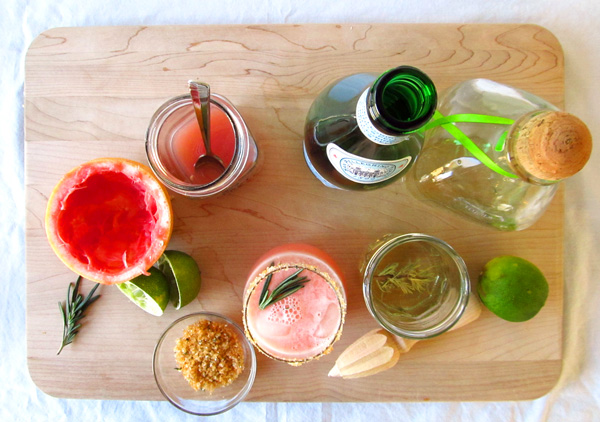
Rosemary Grapefruit Sparkling Margaritas

Sparkling Rosemary Grapefruit Margaritas

It was a tradition when we were in college to go get margaritas on Thursdays.  It was in the last day we were in a school during the week, and we had very light Fridays.  Thus, Thursdays were the perfect time to eat way too many chips and salsa and drink way too many margaritas.

Grapefruit Margaritas

It was around that table, surrounded by all my friends, in a restaurant aptly called Margaritas, that I fell in love with the drink.  And thankfully, I never got sick of them from over imbibing--I love tequila and margaritas to this day.

Rosemary Grapefruit Sparkling Margaritas

And while I still can't say no to enjoy a frosty frozen restaurant margarita, this sparkling rosemary grapefruit margarita is in an entirely different class. With fresh fruit juice, homemade simple syrup, and a delicious just there herby taste, the fresh homemade margarita stands alone.

Sparkling Grapefruit Margaritas with Rosemary Simple Syrup

And while I love tequila, it sits calmly in the background, mixing and playing with all the ingredients to create a really delicious margarita with very little tequila burn.  The grapefruit is the star of the show, the simple syrup sweetens and gives a barely there rosemary taste that adds so much depth to the drink, and the sparkling water tops it all off, and makes the margarita bubbly! I can't say no to bubbles.

Grapefruit Margarita gif

Rosemary Grapefruit Sparkling Margaritas
Author: Happy Food Happy Home
Serves 2-3

Rosemary Simple Syrup
½ cup water
½ cup sugar
1 sprig fresh rosemary

Margarita
2 grapefruits, juiced (about 1 ½ cups of juice)
2 limes, juiced (about ½ cup of juice)
4 ounces tequila
2 ounces simple syrup

Rosemary Grapefruit Sugared Rim
½ teaspoon rosemary, chopped very finely
½ teaspoon grapefruit zest
1 tablespoon turbinado sugar

Sparkling Water
  1.  Combine the water, sugar, and rosemary in a small saucepan. Heat over medium low heat, stirring occasionally, until the sugar is dissolved.
  2. Combine the chopped rosemary, grapefruit zest, and turbinado sugar on a small plate.
  3. Use a little simple syrup to line the rims of two or three glasses. This will help the sugar stick to the glass.
  4. Gently roll the rims of the glasses in the turbinado sugar mixture.
  5. Combine the grapefruit juice, lime juice, tequila, and 2 ounces of the simple syrup in a cocktail shaker with ½ cup ice cubes. 
  6. Shake vigorously for 30 seconds.
  7. Add three ice cubes to each of the rimmed glasses.
  8. Pour the margarita evenly into the glasses.
  9. Top with sparkling water to taste.*
  10. Enjoy!
*I probably used a little less than ¼ cup in my margaritas. 

Grapefruit Margarita

Make this delicious rosemary grapefruit to celebrate winter citrus, a snow day at school, or just because you really want to! Do you love margaritas? One of my friends can't stand tequila, and it's all my fault--but that's a story for another day :)

February 11, 2015

Rosemary Brined and Roasted Pork Loin

Pork Loin Roast with Rosemary, Potatoes, and Carrots

Do you have a plan for Valentine's Day dinner? Yeah, I don't either! Especially because I made this delicious pork roast already and don't have another one to cook. But I'd recommend you run to the store, buy a pork roast, and make this for your special someone for Valentine's Day.

Brined Pork Loin Roast

This pork roast is savory, juicy, and delicious. Brining is the way to go with pork--it's like giving the roast a delicious salty bath, and it is the easiest way to make sure your pork is flavorful and juicy. I love the lemon and rosemary additions to the brine. They add so much subtle flavor to the final roast. Rosemary pretty much makes me happy in anything!

Rosemary and Lemon Brined Roasted Pork Loin

Roasting the pork surrounded by carrots and potatoes and onions and yum makes this a delicious, easy one pan meal. And if you make the brine the night before, put the roast in the pot in the morning, and then roast when you get home, it's a 1 hour fridge to table meal.

Rosemary Roasted Pork Loin with Potatoes and Carrots

The potatoes are creamy, the carrots sweet and a little charred, and the onions almost caramelize on the sheet pan.  The pork gets crispy on top and stays super juicy. And the rosemary ties everything together without being overpowering.

Roasted Rosemary Pork Loin Roast

Rosemary Brined and Roasted Pork Loin with Potatoes and Carrots

Author: Happy Food Happy Home
Serves 2-4

Brine
2 cups water
½ cup kosher salt
¼ cup packed brown sugar
1 bay leaf
1 teaspoon peppercorns
1 teaspoon fennel seeds
1 sprig fresh rosemary
1 lemon, cut in half
½ onion, roughly chopped
1 garlic clove, peeled and smashed
1 2 pound pork roast

Potatoes and Carrots
1 ½ pounds baby red potatoes
4 medium carrots
½ large onion, cut into quarters
2 garlic cloves, peeled
1 teaspoon rosemary, chopped
1 teaspoon kosher salt
1 teaspoon black pepper
Olive oil, to coat

Rosemary Rub
1 teaspoon chopped rosemary
½ teaspoon black pepper
¼ teaspoon kosher salt

Prepare Brine
  1. Combine 2 cups of water, salt, sugar, bay leaf, peppercorns, fennel seeds, and rosemary in a large pot.*
  2. Heat over medium heat, stirring occasionally, until sugar and salt have dissolved. Remove from heat.
  3. Add in the lemon, onion, and garlic.
  4. Using a measuring cup, fill with 2 cups of ice cubes.  Then add cold water and fill in around the ice.
  5. Add the water/ice to the pot. Stir to combine and cool.**
  6. Add the pork loin roast to the brine.
  7. Brine for 8-10 hours. Flip the roast over halfway through the time.

Prepare Vegetables
  1. Peel the carrots and cut into large chunks. Place in a large mixing bowl.
  2. Wash the potatoes and put in the bowl.
  3. Add the rosemary, salt, pepper, and olive oil to the bowl. Stir to combine.
  4. Add the onion and the garlic cloves.  Stir once, trying not to break apart the onion.

Cook
  1. Preheat your oven to 350 degrees.
  2. Remove the roast from brine scraping off anything that sticks to it.
  3. Place the roast fat side up in the center of a parchment paper covered rimmed sheet pan.
  4. Mix together the rosemary, pepper, and salt and sprinkle over the roast.
  5. Dump the vegetables around the roast. Spread them out in an even layer.
  6. Cook the roast for about 20 minutes per pound until in the internal temperature is 145 degrees.
  7. Remove the roast from the oven and allow to rest for 15 minutes before slicing and serving.

*large enough to fit your roast

**you can store the brine like this in the refrigerator for 24 hours

Recipe for Rosemary Brined and Roasted Pork Loin

What are your plans for Valentine's Day?  After one evening a few years ago when we waited 90 minutes for a table, Dustin and I decided to stay home on Valentine's Day. Romantic evening at home it is!

February 9, 2015

Chocolate Chocolate Chocolate Tart

Chocolate Chocolate Chocolate Tart

Dustin loves chocolate. He doesn't like cake, pie is definitely not his favorite--he is straight chocolate all the way. Because of his no cake/no pie stance on desserts, occasionally I make him something that is all chocolate and just for him.

Delicious Rich Triple Chocolate Tart

This Chocolate Chocolate Chocolate Tart definitely fits the bill.  It is the perfect dessert for a romantic Valentine's Day dinner at home!  It is rich and chocolaty with the perfect amount of vanilla and espresso powder to amp up the chocolate flavor without overpowering it at all.

A piece of decadent chocolate tart

We ate half a couple pieces of the tart, and then I took the rest to my grandma's birthday.  My cousin claimed I was magic because the tart is so good. I laughed, but really.  It's like a chocolate truffle coated with extra dark chocolate all wrapped up in crunchy buttery graham cracker crust.

Chocolate Chocolate Chocolate Tart--an easy Valentine's Day dessert

And the chocolate tart simple to make!  It's really just 3 simple steps--no double broiler, no fancy techniques, and a seriously impressive and delicious result!

Easy Chocolate Tart

Chocolate Chocolate Chocolate Tart Recipe
author: Abby at Happy Food Happy Home
adapted from Epicurious
Serves 8-12
Crust
1 package chocolate graham crackers
3 tablespoons coconut oil
2 tablespoons butter
Pinch of salt
A 9 inch tart pan
  1. Preheat your oven to 350 degrees.
  2. In a food processor, pulse the graham crackers until crushed.
  3. Add the salt and pulse until combined.
  4. In a glass measuring cup, melt the butter and coconut oil together.
  5. Pour half the melted butter/coconut oil mixture into the crumbs and pulse until combined. Scrape the bottom of the food processor.
  6. Add the remaining butter/coconut oil and pulse into combined.
  7. Pour the crust mixture into the tart pan. Press firmly into the bottom and up the sides of the tart pan
    • To get firm edges, I press two of my fingers into the flutes all the way around the pan. It’s a little time consuming, but it works!
  8. Bake the crust for 10 minutes until it is firm.
  9. Remove from oven and set aside. Don’t turn off the oven. 
Filling
1 ¼ cup of heavy cream
9 ounces dark chocolate (60-65 percent), chopped
½ teaspoons espresso powder
2 large eggs
1 teaspoon vanilla
¼ teaspoon salt
  1. In a heat proof bowl, sprinkle the espresso powder over the chocolate pieces.
  2. Bring the cream to a boil.
  3. In a small bowl whisk together the eggs, vanilla, and salt.
  4. Pour the cream over the chocolate.  Whisk until melted and combined.
  5. Add the egg mixture and whisk until combined.
  6. Pour into the baked crust.
  7. Bake at 350 for 20 minutes until the edges are set but the middle still wiggles a bit.
  8. Remove from oven and let cool for about 20 minutes until room temperature.
    • You can also cool the tart in the freezer for about 10 minutes.

Glaze
2 tablespoons heavy cream
1 ¾ ounces chocolate, finely chopped
1 teaspoon light corn syrup
1 tablespoon warm water
  1. Place the chocolate and the corn syrup in a heat proof bowl.
  2. Bring cream to a boil.
  3. Pour over the chocolate and corn syrup. Whisk together until combined.
  4. Add the water and whisk until thoroughly combined. Try not to incorporate too many air bubbles into the chocolate.
  5. Pour the glaze in the middle of the cooled tart. Rotate the tart in a circle to spread the glaze around. You can also use an offset spatula to spread the glaze.
  6. Allow the tart to cool and set for approximately 1 hour.
  7. Slice into thin pieces and serve!
Chocolate Tart with Vanilla and Espresso Powder

The Chocolate Chocolate Chocolate Tart is a perfect decadent chocolate dessert. It would great to make for a special someone for a Valentine's Day dessert!


Related Posts Plugin for WordPress, Blogger...