
We're getting our new couch this weekend! Woo! We are starting to add permanent 'grown-up' furniture to our living room. We're keeping photos and the tv, but are slowly working on replacing everything else.
Sometimes I feel like the blog world reveals changes too quickly. If we were to revamp this entire room at one time our budgets would be blown, and we would be exhausted. Slow and steady, right?
This mood board shows the direction we're going with the living room. A big large couch--actually larger than the one in the picture, we're adding a chaise too--for lots of seating. Some dark wood tones will be added in for depth with a console shelf, tv stand, and accessories.
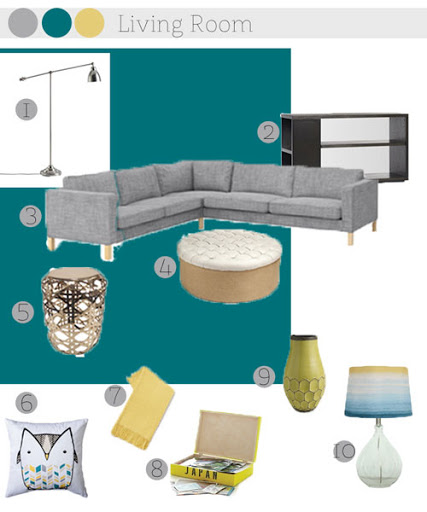
And of course bright shiny things! The tall floor lamp and the basket weave stool will play off of each other. Add a glass lamp and some bright, cheery yellow accessories, and I really can't wait to pull this room together.
The ottoman in the picture does not represent the colors I want to use! It's the closest image I could find to the one I have in my head :) I'm planning on building the ottoman and attaching dark wood feet to it as well. I just have to decide on a fabric!
Click here to see a Pinterest Board with all the links to the items in the mood board. You can also click on the numbers beside the item to have them take you there.
Is anyone else redecorating their living room? What about purchasing grown-up furniture? Does anyone else have to have shiny things in each room?
Sometimes I feel like the blog world reveals changes too quickly. If we were to revamp this entire room at one time our budgets would be blown, and we would be exhausted. Slow and steady, right?
This mood board shows the direction we're going with the living room. A big large couch--actually larger than the one in the picture, we're adding a chaise too--for lots of seating. Some dark wood tones will be added in for depth with a console shelf, tv stand, and accessories.
And of course bright shiny things! The tall floor lamp and the basket weave stool will play off of each other. Add a glass lamp and some bright, cheery yellow accessories, and I really can't wait to pull this room together.
The ottoman in the picture does not represent the colors I want to use! It's the closest image I could find to the one I have in my head :) I'm planning on building the ottoman and attaching dark wood feet to it as well. I just have to decide on a fabric!
Click here to see a Pinterest Board with all the links to the items in the mood board. You can also click on the numbers beside the item to have them take you there.
Is anyone else redecorating their living room? What about purchasing grown-up furniture? Does anyone else have to have shiny things in each room?


