August 26, 2013

Gray and Coral Bathroom Mood Board

I've had a lot different ideas for our half bathroom. Dark teal with a silver ceiling? Bright green like the kitchen is going to be?  Stripes?  A simple gray is what we decided to go with. We don't want it to be too much of a focal point, and the gray will make it nice and soothing.

The half bathroom is visible from both the kitchen and the living room, and it's the main bathroom our guests use while they are here. We also use it quite often--so it needs to be functional for us and guests. 

It's also currently a rather odd shade of green (most of the house was when we bought it.) It's also a room that we don't have touch up paint for. So after we patched the holes, we've been living with some pretty patched spots on the walls. It's a good look :)


I'm super excited to start this makeover! Gray paint will bring in the color we're going to paint the main walls in the living rooms. And I think the coral accents will be a fun pop of unexpected color that will give the room some interest, but won't stand out too much. 

White accessories are clean and classic, and I like that I can switch them between rooms if the mood strikes.  A few of the accessories I'm planning to DIY.  Paint swirling the vases and attempting to silver leaf a mirror frame.  Sounds like a good time to me!

What's your go to color for a small bathroom? Do you go subtle or bold?

May 15, 2013

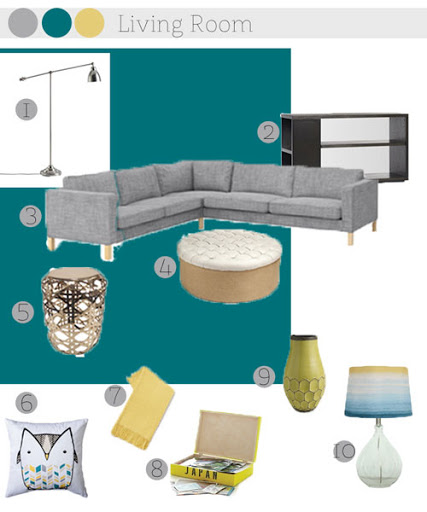
Our Living Room Mood Board

We're getting our new couch this weekend! Woo! We are starting to add permanent 'grown-up' furniture to our living room.  We're keeping photos and the tv, but are slowly working on replacing everything else.

Sometimes I feel like the blog world reveals changes too quickly. If we were to revamp this entire room at one time our budgets would be blown, and we would be exhausted. Slow and steady, right?

This mood board shows the direction we're going with the living room.  A big large couch--actually larger than the one in the picture, we're adding a chaise too--for lots of seating.  Some dark wood tones will be added in for depth with a console shelf, tv stand, and accessories.

Image Map

And of course bright shiny things! The tall floor lamp and the basket weave stool will play off of each other. Add a glass lamp and some bright, cheery yellow accessories, and I really can't wait to pull this room together.

The ottoman in the picture does not represent the colors I want to use! It's the closest image I could find to the one I have in my head :) I'm planning on building the ottoman and attaching dark wood feet to it as well. I just have to decide on a fabric!

Click here to see a Pinterest Board with all the links to the items in the mood board.  You can also click on the numbers beside the item to have them take you there.

Is anyone else redecorating their living room?  What about purchasing grown-up furniture?  Does anyone else have to have shiny things in each room?

May 2, 2013

I Heart You Maps


I knew I needed something gushy romantic to give to Dustin for our anniversary, and the Spring Pinterest Challenge brought to us by Sherry, Katie, Emily, and Renee gave me the perfect motivation.  I loved the idea of using maps to commemorate important places to us.

I saw hearts made out of maps, and while I loved the idea of using real maps, I didn't like the possibility of tracking down maps that were zoomed in enough to cut out hearts the size I wanted.


So I got creative! By using Google Maps I was able to get the places exactly where I wanted, and the resulting images were clean and modern. I loved them, and Dustin did too!

Here's the tutorial to make your own I Heart You Maps!

Supplies

  • picture frames
  • photo editing software (I used Photoshop elements)


1. Go to Google Maps and zoom in on the location you want. Use your computer to take a screen capture of the map.  Remember to make it wide and tall--you have to fit a heart onto it!
2. Save the image to your computer and open in your photo editing software.


3. In Elements create a new image the size you want (mine is 5x7).


4. Drag your map image into your blank canvas. This will create a new layer. Adjust your layer to roughly fit on the blank image. It doesn't need to fit exactly because you're going to make a heart!


5. Create a new layer. Use the custom shape tool to make a heart. Make it as big or as little as you want! 


6. Arrange the order of the layers so the heart is below your map. 
7. Select the Map layer and open the Layers Menu.  Click "Create Clipping Mask," and you will have a heart!


8. You can adjust your background color and move your map until you're satisfied with your image. Then print and frame them!


I would suggest if you're going to create multiple maps to copy the heart layer into each new image. This makes sure the heart is the same size. Or you can just replace the map layer in your original -just make sure to save each one! 


I love our heart maps! They're a great way to commemorate where we've been! They always make me happy when I look at them. So create your own heart maps!


If you made I Heart you maps where would your maps show? Where you vacationed as a family? Where you first met? Tell me in the comments!

April 30, 2013

Home-Made Funfetti Cupcakes


Sometimes I get cravings for things. These things tend to center around chocolate and sometimes around cake. This time it was funfetti cake--funfetti cake immediately takes me back to childhood.  The only time I've seen these cakes has been from a box, and I wanted to try to make them from scratch.

I found this great recipe from Annie's Eats and decided to try it. They were a little complicated to put together (lots of steps), but the end product was delicious and totally worth it!


Funfetti Cupcakes with Buttercream Frosting
slightly adapted from Annie's Eats


For the Cupcakes:
  • 1 cup whole milk, divided
  • 6 large egg whites
  • 1 tablespoon vanilla extract
  • 1/2 teaspoon almond extract (optional)
  • 2¾ cups cake flour
  • 1½ cups sugar
  • 1 tablespoon plus 1 teaspoon baking powder
  • ¾ tsp. salt
  • 12 tbsp. (¾ cup) unsalted butter, at room temperature
  • ½ cup multi-colored jimmies sprinkles (like these)


For the Frosting
  • 3 sticks plus 2 tablespoons unsalted butter
  • 3 cups powdered sugar
  • Pinch of salt
  • 2 tablespoons heavy cream
  • 1 ½ tablespoons vanilla extract

  • Extra jimmies for decorating


Funfetti Cupcakes
  1. Line cupcake pans with paper liners.  
  2.  In a measuring cup, combine ¼ cup of the whole milk, egg whites, vanilla and almond extracts.  Whisk together.  
  3. Whisk or sift the cake flour, sugar, baking powder, and salt together.
  4.  Add in the butter and mix with a  mixer on low until the mixture resembles wet sand--about 30 seconds.  
  5. Mix in the remaining ¾ cup of milk, then increase the speed to medium and beat for about 90 seconds more.  
  6. With the mixer on low speed, add the egg white mixture in three additions, mixing for about 20 seconds after each addition.  Scrape down the bowl as needed.  
  7. Gently fold in the sprinkles with a spatula.
  8. Divide the batter between the prepared cupcake liners, filling each about two-thirds of the way full.
  9.  Bake about 12-15 minutes until a toothpick inserted in the center comes out clean.  
  10. Prepare frosting while cupcakes are baking.
  11. Let the cupcakes cool in the pan briefly, then transfer to a wire rack and allow to cool completely before frosting.


Buttercream Frosting
  1. Place butter in bowl and whip with an electric mixer until smooth--about 1 minute.
  2. Add powdered sugar in 3 parts until just combined.
  3. Add salt, cream, and vanilla. Mix until combined.
  4. Increase mixer speed and whip the mixture until light and fluffy--about 5 minutes.  
  5. Use an offset spatula to frost your cooled cupcakes. Definitely don't eat any extra frosting! Or do..lots of it. 

Related Posts Plugin for WordPress, Blogger...