Showing posts with label House. Show all posts

April 3, 2014

How to Clean and Care for a Wood Cutting Board


My best friend in the kitchen is my giant wooden cutting board.  It's literally huge, and I literally use it every time I cook.  My cutting board has his own spot on the counter-right between the stove and the sink.  It is the perfect prep spot and the cutting board let's me do all my work in one spot.

After!
I use my cutting board to chop and, for gathering my mis en place, and as a general spot to sit anything and everything.  I also use him as a back drop for food photos, and occasionally as a hot pad. 

As a result of all this hard work my cutting board was in need of a deep cleaning and an oiling.  (He was getting kind of grungy.)


Follow these steps for a great looking and working wooden cutting board.  If you take good care of the cutting boards they should last a really really long time.  

How to Clean and Care for A wooden Cutting Board
Author: Happy Food Happy Home

Supplies
Wooden Cutting Board
220 grit sandpaper
sanding block
Lemon
Kosher Salt
Coconut Oil
Paper Towels or a clean dry cloth
  1. Optional-If needed use the sanding block and sandpaper to sand the surface of your cutting board.  Sanding will help remove stains, buff out knife scratches, and smooth the surface of your cutting board.  Don't try to be perfect--you might end up with an uneven surface; just lightly sand the surface. Use a damp paper towel to wipe off the sawdust.
  2. Cut the lemon in half.  Pour a teaspoon of salt onto the surface of the cutting board. Use the lemon half to scrub the salt into the cutting board, focusing on stains.  Cover the surface of the cutting board with the lemon juice-salt mixture.  Flip the board over and repeat on the other side with an additional teaspoon of salt.  Let the cutting board sit for approximately 5 minutes.
  3. Thoroughly rinse the cutting board and allow it to air dry completely.
  4. Using your hands massage about 1 tablespoon of coconut oil into each side of the cutting board.  Flip the board over onto a towel before doing the second side.  Let the board sit overnight to allow it to absorb all the oil it can. 
  5. After its overnight soak use paper towels to buff the excess coconut oil off of the board. If your board is dry, repeat the coconut oil massage and allow to sit again.   

Your board is ready for use!  To keep clean day to day rinse your cutting board after every use.  If you cut meat on your wood surface use soap to wash before using with other ingredients. Allow board to dry out between washings-if the board gets water inside it may crack. 


You can oil your board once or twice a month, or you can wait longer. Just follow steps 2-6 for a great looking wooden cutting board.  My cutting board was really overdue for a good cleaning and oiling, but looks wonderful now!  I would recommend only sanding about once a year-if you sand too often there won't be anything left of your cutting board!


Just a note:  I bought my wooden cutting board at a kitchen supply store.  It was cheap-only 15 dollars-but a little rough.  I did an initial sanding to smooth out the roughness before I ever started using it.  After sanding it was as smooth as butter and functions just as well as a 100 dollar cutting board. 

August 26, 2013

Gray and Coral Bathroom Mood Board

I've had a lot different ideas for our half bathroom. Dark teal with a silver ceiling? Bright green like the kitchen is going to be?  Stripes?  A simple gray is what we decided to go with. We don't want it to be too much of a focal point, and the gray will make it nice and soothing.

The half bathroom is visible from both the kitchen and the living room, and it's the main bathroom our guests use while they are here. We also use it quite often--so it needs to be functional for us and guests. 

It's also currently a rather odd shade of green (most of the house was when we bought it.) It's also a room that we don't have touch up paint for. So after we patched the holes, we've been living with some pretty patched spots on the walls. It's a good look :)


I'm super excited to start this makeover! Gray paint will bring in the color we're going to paint the main walls in the living rooms. And I think the coral accents will be a fun pop of unexpected color that will give the room some interest, but won't stand out too much. 

White accessories are clean and classic, and I like that I can switch them between rooms if the mood strikes.  A few of the accessories I'm planning to DIY.  Paint swirling the vases and attempting to silver leaf a mirror frame.  Sounds like a good time to me!

What's your go to color for a small bathroom? Do you go subtle or bold?

May 15, 2013

Our Living Room Mood Board

We're getting our new couch this weekend! Woo! We are starting to add permanent 'grown-up' furniture to our living room.  We're keeping photos and the tv, but are slowly working on replacing everything else.

Sometimes I feel like the blog world reveals changes too quickly. If we were to revamp this entire room at one time our budgets would be blown, and we would be exhausted. Slow and steady, right?

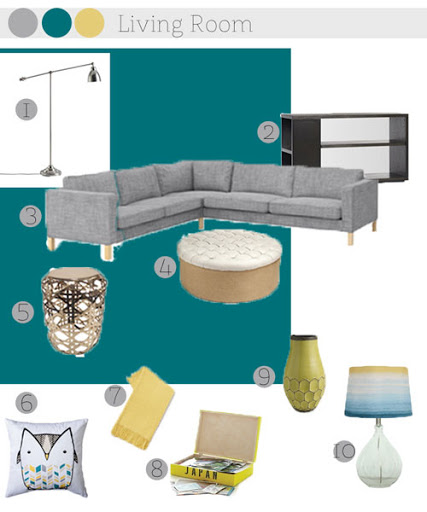
This mood board shows the direction we're going with the living room.  A big large couch--actually larger than the one in the picture, we're adding a chaise too--for lots of seating.  Some dark wood tones will be added in for depth with a console shelf, tv stand, and accessories.

Image Map

And of course bright shiny things! The tall floor lamp and the basket weave stool will play off of each other. Add a glass lamp and some bright, cheery yellow accessories, and I really can't wait to pull this room together.

The ottoman in the picture does not represent the colors I want to use! It's the closest image I could find to the one I have in my head :) I'm planning on building the ottoman and attaching dark wood feet to it as well. I just have to decide on a fabric!

Click here to see a Pinterest Board with all the links to the items in the mood board.  You can also click on the numbers beside the item to have them take you there.

Is anyone else redecorating their living room?  What about purchasing grown-up furniture?  Does anyone else have to have shiny things in each room?

May 2, 2013

I Heart You Maps


I knew I needed something gushy romantic to give to Dustin for our anniversary, and the Spring Pinterest Challenge brought to us by SherryKatieEmily, and Renee gave me the perfect motivation.  I loved the idea of using maps to commemorate important places to us.

I saw hearts made out of maps, and while I loved the idea of using real maps, I didn't like the possibility of tracking down maps that were zoomed in enough to cut out hearts the size I wanted.


So I got creative! By using Google Maps I was able to get the places exactly where I wanted, and the resulting images were clean and modern. I loved them, and Dustin did too!

Here's the tutorial to make your own I Heart You Maps!

Supplies

  • picture frames
  • photo editing software (I used Photoshop elements)


1. Go to Google Maps and zoom in on the location you want. Use your computer to take a screen capture of the map.  Remember to make it wide and tall--you have to fit a heart onto it!
2. Save the image to your computer and open in your photo editing software.


3. In Elements create a new image the size you want (mine is 5x7).


4. Drag your map image into your blank canvas. This will create a new layer. Adjust your layer to roughly fit on the blank image. It doesn't need to fit exactly because you're going to make a heart!


5. Create a new layer. Use the custom shape tool to make a heart. Make it as big or as little as you want! 


6. Arrange the order of the layers so the heart is below your map. 
7. Select the Map layer and open the Layers Menu.  Click "Create Clipping Mask," and you will have a heart!


8. You can adjust your background color and move your map until you're satisfied with your image. Then print and frame them!


I would suggest if you're going to create multiple maps to copy the heart layer into each new image. This makes sure the heart is the same size. Or you can just replace the map layer in your original -just make sure to save each one! 


I love our heart maps! They're a great way to commemorate where we've been! They always make me happy when I look at them. So create your own heart maps!


If you made I Heart you maps where would your maps show? Where you vacationed as a family? Where you first met? Tell me in the comments!

April 19, 2013

Great Colorful Front Doors

I love colorful front doors. They're my favorite. Because of our slightly really faded siding it was difficult to decide what color to paint our front door. We decided to match it to the inside of our house--I love it!  Here are a few colorful front doors that may inspire you to paint your front door!

Oregon_rect540

Turquoise front door from Apartment Therapy

yellow front door

Yellow and blue front door from HGTV


Our neighbor's great orange front door

Create Eye-Catching Curb Appeal
Red! I love red! And the westie--he's adorable too! From BHG


And finally a bright green front door. I love those house numbers too! From BHG

p.s. If you're going back and forth about a colorful door--JUST DO IT! It will make you happy everyday! 

What color is your front door? Did you choose tame or wild?
Related Posts Plugin for WordPress, Blogger...