Showing posts with label Cooking. Show all posts

March 10, 2015

Cheeseburger Soup

Cheeseburger Soup Recipe

I think I first heard the words "Cheeseburger Soup" on an episode of Diners, Drive-Ins, and Dives. I loved watching that show and seeing all the cool places they found to feature. It really made me want to seek out and try new restaurants around me!  And cheeseburger soup?? Who can say no to that?

Real Food Cheeseburger Soup

I'm not really sure what the recipe was on the show, or even what restaurant they were talking about. But I couldn't stop thinking about cheeseburger soup. This soup recipe has become one of our favorites; I love it because it's easy to throw together and I almost always have everything on hand. Dustin loves it because it's cheesy and meaty and absolutely delicious.

Cheeseburger Soup with Tomatoes

I use three kinds of cheese in the soup for extra flavor and cheesy punch. The spices and tomatoes keep this from feeling too much like fondue. And I use ground turkey for the meat because no one can tell the difference! It's also a lean meat that keeps the soup from getting to heavy.

Recipe Cheeseburger Soup

I love serving this soup with pretzel rolls--it's like a hamburger on a pretzel bun! Cheeseburger soup is a delicious soup recipe that I love making. It's easy, filling, and a fast dinner to throw together.


Cheeseburger Soup
author: Happy Food Happy Home
Serves 2-4

2 tablespoons olive oil
1 medium onion, diced
1 garlic clove, minced
1 jalapeno, minced
1 pound ground turkey
1 tablespoon chili powder
1 teaspoon paprika
1 (14 ounce) can diced tomatoes
2 cups chicken broth
salt and pepper
1 teaspoon oregano
½ teaspoon ground mustard
1 bay leaf
1/2 cup shredded Colby Jack cheese (shredded from a block, not pre-shredded!*)
1 ½ teaspoons corn starch
¼ cup (1/2 block) cream cheese
2 slices American cheese
  1. Heat the olive oil over medium heat in the bottom of your favorite soup pot.
  2. Add the onion to the pot and cook until softened, approx 5 minutes. 
  3. Add the jalapeno and the garlic to the onions and cook for 1 minute.
  4. Add ground turkey and season with salt and pepper.  Cook until browned, about 10 minutes.
  5. Add in the chili powder and paprika, and toast with the ground turkey for 30 seconds. 
  6. Add the chicken broth, tomatoes, oregano, ground mustard, and bay leaf.  Allow soup to come to a simmer.
  7. Cut cream cheese into small chunks and stir into the soup.
  8. Meanwhile, shred the Colby Jack cheese and toss with the corn starch.
  9. Add the shredded cheese and corn starch mixture to the pot.  Stir until the cheese has melted and incorporated into the soup. 
  10. Add the American cheese slices and stir until melted. 
  11. Ladle in to bowls and serve with yummy crusty bread or pretzel crackers. 
*Because pre-shredded cheese has a non-caking agent added to it, it often doesn't melt into the soup correctly.

Cheeseburger Soup Recipe

You should definitely give cheeseburger soup a try. I bet it will become a favorite meal in your house, especially if you love soup and cheese!

Are you following along?? Follow me on Pinterest, Instagram, or Google+

March 3, 2015

Ham and Leek Scalloped Potatoes

Warm and Creamy Ham and Leek Scalloped Potatoes

Winter has hit Indiana hard these past couple of weeks.  What started out as a very mild winter has taken an abrupt turn--there's about a foot of snow on the ground right now. And all the cold snowy weather has me craving comfort foods again; right when I thought it was safe to start eating salads.

Scalloped Potatoes made with Ham and Leeks

Because I was craving warm and creamy deliciousness, I pulled some of my leftover Christmas ham out of the freezer and started dreaming about how to combine it with potatoes and cheese and warmth. Scalloped potatoes came to mind-maybe because we had eaten them with the ham in the first place.

A slice of Ham and Leek Scalloped Potatoes

So I combined leftover ham, and scalloped potatoes and threw a leek in too for added depth of flavor and a vegetable in this 'casserole'. Add in Gruyere cheese for a salty cheese hit, Colby Jack for creamy, melty, stringy cheese, and layer it all together topped with cream and chicken broth. And this comfort food ham and leek scalloped potatoes really hit the spot--the warm and creamy deliciousness spot!

Creamy Scalloped Potatoes with Ham and Leek

Though the scalloped potatoes may look a little intense--there are lots of layers--the most time consuming part is making sure everything is sliced and shredded. Assembling is super easy, cover the scalloped potatoes with foil, and put in a rather hot oven until the cream has thickened, the potatoes have softened, and the cheese has melted. In other words, until the ham and leek scalloped potatoes are ready to go in your belly!

Ham and Leek Scalloped Potatoes
author: Happy Food Happy Home
serves: 4

Prep Time: 20 minutes
Cook Time: 

1 tablespoon of olive oil
1 medium leek, diced
1 large garlic clove, minced
3 teaspoons fresh herbs--I used rosemary and sage
4 cups thinly sliced potatoes
1/2 cup heavy whipping cream
3/4 teaspoon salt
1/2 teaspoon black pepper
3/4 cup shredded Gruyere cheese
3/4 cup shredded  Colby Jack cheese
1 cup diced ham
1/4 cup chicken broth

  1. Slice the potatoes as thinly as you can. I used the smallest setting on my mandolin. Place the potatoes in a large bowl and cover with water to keep them from browning.
  2. Heat the olive oil in a large skillet over medium heat.
  3. Add the leek to the hot oil and cook until it has softened, about 5 minutes.
  4. Meanwhile, mince the garlic and herbs.
  5. Add the minced garlic and herbs to the pan and cook for 1 minute more.
  6. Preheat your oven to 400 degrees.  Grease an 8x8 baking dish.
  7. Drain the water off of the potatoes.
  8. Add the leek-garlic-herb mixture, the whipping cream, and the salt to the potatoes. Toss to coat.
  9. In the greased baking dish, place 1/3 of the potatoes in an overlapping even layer. Drizzle some of the cream from the bottom of the bowl over the potatoes.
  10. Add ½ of the ham and 1/3 of the shredded cheese in an even layer on top of the potatoes.
  11. Gently pour half of the chicken broth over the layer.
  12. Add another layer of 1/3 of the potatoes. Drizzle with cream mixture.
  13. Top with remaining ham and 1/3 of the cheese.
  14. Add another layer with the remaining potatoes. Pour remaining cream on top.
  15. Gently pour the rest of the chicken broth over the layer.
  16. Top with the remaining cheese.
  17. Cover the baking dish with aluminum foil.
  18. Bake for 45-55 minutes until the potatoes are soft and the cream has thickened.
  19. In the last 10 minutes of cooking time remove the foil to make the cheese on top brown and delicious. 
adapted from Pinch of Yum

Creamy and Delicious Ham and Leek Scalloped Potatoes

The Ham and Leek Scalloped Potatoes will be a perfect way to use up any leftover Easter ham you have. It is also perfect to make any time you are craving a warm and creamy dinner. My only hope is by Easter I'll be eating this because it's delicious, and not because it is still freezing outside... Is it spring in your part of the world yet? I promise to only be a little jealous! 


February 18, 2015

Rosemary Black Pepper Popcorn

Rosemary Black Pepper Popcorn

When I was growing up popcorn was my favorite snack. Throw a bag in the microwave after school, and I was good to go until dinner! And sometimes popcorn was dinner and sometimes it was breakfast too. And don't even get me started with how much popcorn we ate in college!

Popcorn flavored with rosemary, black pepper, and butter

A while ago I stopped buying microwave popcorn, but I love making popcorn on the stove top. It tastes so much better than microwave popcorn, and it's almost as fast.

Popcorn with Rosemary and Black Pepper

And while the popcorn is popping I love melting butter and adding seasonings to flavor the popcorn. I love adding flavors and combinations to spice up popcorn. Here rosemary and black pepper combine with melted butter to add depth.

Rosemary Black Pepper Popcorn

Rosemary is such a great addition to popcorn and black pepper adds another hit of flavor to punch up the popcorn. Salt and butter tie it all together, and you just can't stop eating the rosemary black pepper popcorn! I love trying new flavors, and now I can't stop adding things to popcorn!

Rosemary Black Pepper Popcorn

Rosemary Black Pepper Popcorn
Author: Happy Food Happy Home
Serves: 1-2

1 tablespoon coconut oil
¼ cup popcorn kernels

2 tablespoons salted butter
1 teaspoon chopped rosemary
1 teaspoon black pepper

Kosher salt to taste
  1. Heat coconut oil* over medium high heat in a medium sauce pan with a lid.
  2. Heat the oil until it bubbles around a popcorn kernel dropped in.
  3. Add the popcorn to the hot oil. Toss around in the oil to coat.
  4. Toss the kernels every minute or so until the popcorn is fully popped—when the pauses between the pops are longer than 10 seconds and few kernels remain the pot. Remove from heat.
  5. Combine the butter, rosemary, and pepper in a glass measuring cup.
  6. Microwave for 20 seconds, stir, and microwave for 10 more seconds until the butter is melted.
  7. Add half the popcorn to a large bowl. 
  8. Drizzle half of the butter mixture over the popcorn. Sprinkle a pinch of kosher salt over the popcorn. Use a spoon to toss together.
  9. Add the remaining popcorn, drizzle with remaining butter, and sprinkle with more salt. Toss to combine.
  10. Eat and enjoy!!
*You can use vegetable oil in place of the coconut oil

Rosemary Black Pepper Popcorn

I still love to eat popcorn, and probably eat too much of it! But changing the flavors I add to popcorn makes it a super delicious treat!


February 16, 2015

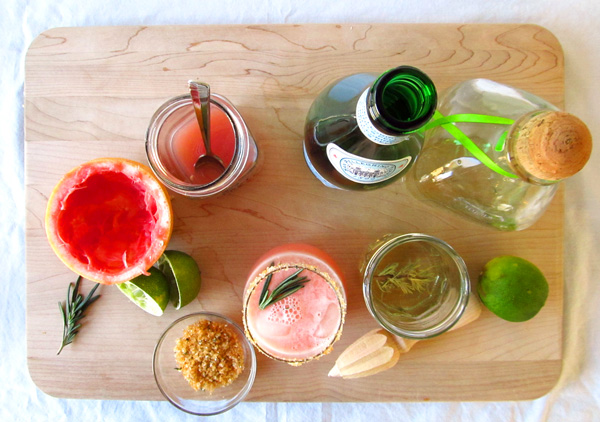
Rosemary Grapefruit Sparkling Margaritas

Sparkling Rosemary Grapefruit Margaritas

It was a tradition when we were in college to go get margaritas on Thursdays.  It was in the last day we were in a school during the week, and we had very light Fridays.  Thus, Thursdays were the perfect time to eat way too many chips and salsa and drink way too many margaritas.

Grapefruit Margaritas

It was around that table, surrounded by all my friends, in a restaurant aptly called Margaritas, that I fell in love with the drink.  And thankfully, I never got sick of them from over imbibing--I love tequila and margaritas to this day.

Rosemary Grapefruit Sparkling Margaritas

And while I still can't say no to enjoy a frosty frozen restaurant margarita, this sparkling rosemary grapefruit margarita is in an entirely different class. With fresh fruit juice, homemade simple syrup, and a delicious just there herby taste, the fresh homemade margarita stands alone.

Sparkling Grapefruit Margaritas with Rosemary Simple Syrup

And while I love tequila, it sits calmly in the background, mixing and playing with all the ingredients to create a really delicious margarita with very little tequila burn.  The grapefruit is the star of the show, the simple syrup sweetens and gives a barely there rosemary taste that adds so much depth to the drink, and the sparkling water tops it all off, and makes the margarita bubbly! I can't say no to bubbles.

Grapefruit Margarita gif

Rosemary Grapefruit Sparkling Margaritas
Author: Happy Food Happy Home
Serves 2-3

Rosemary Simple Syrup
½ cup water
½ cup sugar
1 sprig fresh rosemary

Margarita
2 grapefruits, juiced (about 1 ½ cups of juice)
2 limes, juiced (about ½ cup of juice)
4 ounces tequila
2 ounces simple syrup

Rosemary Grapefruit Sugared Rim
½ teaspoon rosemary, chopped very finely
½ teaspoon grapefruit zest
1 tablespoon turbinado sugar

Sparkling Water
  1.  Combine the water, sugar, and rosemary in a small saucepan. Heat over medium low heat, stirring occasionally, until the sugar is dissolved.
  2. Combine the chopped rosemary, grapefruit zest, and turbinado sugar on a small plate.
  3. Use a little simple syrup to line the rims of two or three glasses. This will help the sugar stick to the glass.
  4. Gently roll the rims of the glasses in the turbinado sugar mixture.
  5. Combine the grapefruit juice, lime juice, tequila, and 2 ounces of the simple syrup in a cocktail shaker with ½ cup ice cubes. 
  6. Shake vigorously for 30 seconds.
  7. Add three ice cubes to each of the rimmed glasses.
  8. Pour the margarita evenly into the glasses.
  9. Top with sparkling water to taste.*
  10. Enjoy!
*I probably used a little less than ¼ cup in my margaritas. 

Grapefruit Margarita

Make this delicious rosemary grapefruit to celebrate winter citrus, a snow day at school, or just because you really want to! Do you love margaritas? One of my friends can't stand tequila, and it's all my fault--but that's a story for another day :)

February 11, 2015

Rosemary Brined and Roasted Pork Loin

Pork Loin Roast with Rosemary, Potatoes, and Carrots

Do you have a plan for Valentine's Day dinner? Yeah, I don't either! Especially because I made this delicious pork roast already and don't have another one to cook. But I'd recommend you run to the store, buy a pork roast, and make this for your special someone for Valentine's Day.

Brined Pork Loin Roast

This pork roast is savory, juicy, and delicious. Brining is the way to go with pork--it's like giving the roast a delicious salty bath, and it is the easiest way to make sure your pork is flavorful and juicy. I love the lemon and rosemary additions to the brine. They add so much subtle flavor to the final roast. Rosemary pretty much makes me happy in anything!

Rosemary and Lemon Brined Roasted Pork Loin

Roasting the pork surrounded by carrots and potatoes and onions and yum makes this a delicious, easy one pan meal. And if you make the brine the night before, put the roast in the pot in the morning, and then roast when you get home, it's a 1 hour fridge to table meal.

Rosemary Roasted Pork Loin with Potatoes and Carrots

The potatoes are creamy, the carrots sweet and a little charred, and the onions almost caramelize on the sheet pan.  The pork gets crispy on top and stays super juicy. And the rosemary ties everything together without being overpowering.

Roasted Rosemary Pork Loin Roast

Rosemary Brined and Roasted Pork Loin with Potatoes and Carrots

Author: Happy Food Happy Home
Serves 2-4

Brine
2 cups water
½ cup kosher salt
¼ cup packed brown sugar
1 bay leaf
1 teaspoon peppercorns
1 teaspoon fennel seeds
1 sprig fresh rosemary
1 lemon, cut in half
½ onion, roughly chopped
1 garlic clove, peeled and smashed
1 2 pound pork roast

Potatoes and Carrots
1 ½ pounds baby red potatoes
4 medium carrots
½ large onion, cut into quarters
2 garlic cloves, peeled
1 teaspoon rosemary, chopped
1 teaspoon kosher salt
1 teaspoon black pepper
Olive oil, to coat

Rosemary Rub
1 teaspoon chopped rosemary
½ teaspoon black pepper
¼ teaspoon kosher salt

Prepare Brine
  1. Combine 2 cups of water, salt, sugar, bay leaf, peppercorns, fennel seeds, and rosemary in a large pot.*
  2. Heat over medium heat, stirring occasionally, until sugar and salt have dissolved. Remove from heat.
  3. Add in the lemon, onion, and garlic.
  4. Using a measuring cup, fill with 2 cups of ice cubes.  Then add cold water and fill in around the ice.
  5. Add the water/ice to the pot. Stir to combine and cool.**
  6. Add the pork loin roast to the brine.
  7. Brine for 8-10 hours. Flip the roast over halfway through the time.

Prepare Vegetables
  1. Peel the carrots and cut into large chunks. Place in a large mixing bowl.
  2. Wash the potatoes and put in the bowl.
  3. Add the rosemary, salt, pepper, and olive oil to the bowl. Stir to combine.
  4. Add the onion and the garlic cloves.  Stir once, trying not to break apart the onion.

Cook
  1. Preheat your oven to 350 degrees.
  2. Remove the roast from brine scraping off anything that sticks to it.
  3. Place the roast fat side up in the center of a parchment paper covered rimmed sheet pan.
  4. Mix together the rosemary, pepper, and salt and sprinkle over the roast.
  5. Dump the vegetables around the roast. Spread them out in an even layer.
  6. Cook the roast for about 20 minutes per pound until in the internal temperature is 145 degrees.
  7. Remove the roast from the oven and allow to rest for 15 minutes before slicing and serving.

*large enough to fit your roast

**you can store the brine like this in the refrigerator for 24 hours

Recipe for Rosemary Brined and Roasted Pork Loin

What are your plans for Valentine's Day?  After one evening a few years ago when we waited 90 minutes for a table, Dustin and I decided to stay home on Valentine's Day. Romantic evening at home it is!

October 20, 2014

Cheesy Loaded Baked Potato and Leek Soup

Cheesy Loaded Baked Potato and Leek Soup

It's fall y'all!! And as it has been raining and chilly around here for the last week or so, it's the perfect time for soup!  Oh, who am I kidding; I always think it's the perfect time for soup.  It drives Dustin crazy because he doesn't really like soup and I want it all the time.

Cheesy Loaded Baked Potato Soup

So to make it up to him, I try to make really hearty, delicious soups that will fill him up.  Cheesy Loaded Baked Potato and Leek Soup fit the bill;  the potatoes and leeks fill up the silky, creamy, cheesy soup base.  Then you top it all off with more bacon, more cheese, and whatever else fits your fancy.   

Cheesy Loaded Baked Potato and Leek Soup

The soup base (liquid? soupy parts? I don't know..) is made with chicken broth, and then cream cheese and monterey jack cheese are added and melted into it.  The result is a super creamy, silky soup that is full of delicious cheesy flavor.  It's not like eating a giant bowl of cheese--not that I would have a problem with that.  It's more like the most delicious bowl of creamy potato soup you've ever had!

Cheesy Loaded Baked Potato and Leek Soup

I make a really a soup with a similar cheesy base, and this soup came to me as we were driving to our hotel on our last night in California.  Maybe I was subconsciously dreading the cold and rainy we were coming home to?  This soup came together wonderfully, and I can't wait to make it again.  Thank you, long California drives, for coming up with this delicious soup!

Cheesy Loaded Baked Potato Soup with Bacon and Chives

Cheesy Loaded Baked Potato and Leek Soup
author: Abby at Happy Food Happy Home
makes 4 generous servings (easily doubled)

1 piece of bacon
1 tablespoon butter
2 cups diced leeks (1 medium leek)
1/2 teaspoon black pepper
pinch of cayenne pepper
4 cups diced waxy potatoes (I used Yukon golds)
4 cups chicken broth
1/2 cup shredded monterey jack cheese (don't use pre-shredded!)
1 teaspoon cornstarch
1/2 block cream cheese (1/2 cup)
1 teaspoon chopped fresh parsley

Toppings
Crumbled Crispy Bacon
Sour Cream
Chives

  1. Cut your bacon into strips.  Add bacon to a cold dutch oven or soup pot.  Heat over medium heat until the bacon is crispy. 
  2. Remove the bacon from the pot leaving the bacon grease behind.  Set bacon pieces aside for topping later.  
  3. Slice leek in half length wise, then cut into thin strips. Place is colander and rinse the leeks thoroughly with cool water.  
  4. Add butter and leeks to the pot.  Stir everything together and cook until leeks have softened, about 5 minutes. 
  5. Add black pepper and cayenne to leeks and stir. Toast for about 30 seconds. 
  6. Add potatoes and chicken broth.  The chicken broth should cover the potatoes--if not add water to cover.
  7. Place lid on pot and bring soup to a boil. Allow soup to boil for about 20 minutes until the potatoes are cooked through.  
  8. Lower heat to a simmer. 
  9. Cut the cream cheese into small cubes and add to the soup.  Stir occasionally and allow to melt. 
  10. Shred the monterey jack cheese and toss with the cornstarch.  
  11. Once the cream cheese has melted, add the monterey jack in two batches to the soup.  Stir thoroughly between each addition. 
  12. When the cheeses have melted and combined into the soup, add the parsley and stir to combine. 
  13. Remove the soup from the heat and serve.
  14. Top with bacon, chives, sour cream, and anything else you normally put on top of baked potatoes!
Notes:  This soup is easily doubled to make more servings!
To Make Vegetarian:  Replace the piece of bacon and butter in Step 1-4 with 2 tablespoons of olive oil. 
Use vegetable broth instead of chicken broth.  
Do not top with bacon :)

Cheesy Loaded Baked Potato and Leek Soup has definitely earned its spot on my soup list.  And Dustin really liked it too!  This would be a perfect soup to invite people over on a chilly evening and share; add some board games, and you've created my perfect evening.  

What's your favorite soup to make when it gets cold?  Chili is on the menu for this weekend!

July 23, 2014

How to Grill Corn on the Cob

How to Grill Corn

I'll admit the first time I grilled corn on the cob I was nervous.  Would it turn out?  Burn?  Taste really awful?  I was amazingly surprised when it came off the grill perfectly cooked, sweet and juicy.  Who knew it could be so easy to cook corn on the cob?  And doing it without steaming up your kitchen makes grilling it even better.

Grilled Corn Recipe

There's not really a trick to this method of grilling corn on the cob.  No soaking, no shucking and wrapping in tin foil, no voodoo magic.  Just three simple steps, and you're good to go.

Grilled Corn on the Cob

Step one--get ride of any shucks or silks that might catch on fire.  Step two--place the corn on a medium hot grill.  Step three--turn three times every five minutes.  Then shuck the corn, the silks come off really easily, and coat in butter.  Yum yum yummy!

How to Grill Corn on the Cob

How to Grill Corn on the Cob

Supplies Needed:
Grill
Scissors

Corn on the cob (shucks on)

  1. Heat grill to medium heat (about 350 degrees). 
  2. Trim the corn shucks  and silks.  I trim off anything that might catch on fire.
  3. Place the corn on the grill.  Turn the corn a third of the way after 5 minutes.  After 5 more minutes rotate the corn again.  Cook for 5 minutes for a total of 15 minutes.
  4. Wait for about 5 minutes; the corn will be hot.  Then shuck the corn.  The silks will come right off the corn (yay!) 
  5. Coat in butter, Mexican Corn toppings, or anything else you want.

Grill Corn

I've started grilling an extra ear of corn or two to cut off the cob and have in summer salads.  Grilling the corn really makes it easy to have perfectly cooked corn.  And it makes it easy for me to eat way to much corn--which was one of my summer goals.

How do you like to cook corn?  Have you ever tried grilling corn on the cob?

July 14, 2014

Spring Berry Brownie Sundaes

Spring Berry Brownie Sundae

Summer camp has been kicking my butt.  We're three weeks in, and I still feel like I'm running everywhere in order to make sure everyone is having a great time.  Luckily that's mostly what I have to worry about-- everyone having fun.  Not a bad job to have.

Spring Berry Brownie Sundae

When I get home in the afternoon I'm normally hungry and tired.  So I love having an afternoon snack.  It's a bit of an indulgence in the middle of my day--a little treat between lunch and dinner.  Most days I convince myself that some fruit or cheese would be a good snack.  But some days I just need somethings chocolate.

Spring Berry Brownie Sundae with Strawberries, Blueberries, and Raspberries

I love brownies, especially ones with a crispy top and a gooey middle.  They're just the perfect little chocolaty bite that I crave.  These brownies are delicious, and I dare I say easy.  Chocolate, a touch of espresso powder, and vanilla make a rich complex brownie that doesn't seem too far away from a traditional brownie.  Brownies don't really need to be messed with, do they?

Brownie Sundae with Spring Berry Syrup

And to make everything even more indulgent and delicious (who can so no to that?)  I topped the brownies with ice cream and my Spring Berry Syrup.  It's like the ultimate brownie sundae served in a jar! It's cute--dare I say twee--and the spring berry brownie sundae is the perfect ending to a hot day at camp.

Spring Berry Brownie Sundaes
author: Happy Food Happy Home
makes 8-10 brownie sundaes

Brownies
3 ounces  70 percent dark chocolate, coarsely chopped
1 stick unsalted butter
¾ cup plus 2 tablespoons granulated sugar
2 large eggs
1 teaspoon vanilla
1 teaspoon espresso powder
½ teaspoon kosher salt (or ¼ teaspoon table salt)
2/3 cup all purpose flour
  1. Preheat oven to 350 degrees.
  2. Butter an 8x8 baking pan.
  3. Set a large glass mixing bowl over a pot of boiling water. 
  4. Add the chocolate and the butter to the bowl and stir until almost melted.
  5. Remove the bowl from the heat and stir until the mixture is smooth.
  6. Whisk in the sugar.
  7. Whisk in the eggs one at a time.
  8. Whisk in the vanilla and the espresso powder. 
  9. Add the flour and salt and stir until just combined.
  10. Pour the brownies into the prepared pan.
  11. Bake the brownies for 25-35 minutes until the top is crisp, the edges are set, and the middle is slightly gooey. 
  12. Allow brownies to cool for about 5 minutes before cutting and assembling the sundaes.

To Assemble Sundaes:
Vanilla Ice Cream
Strawberries, blueberries, and raspberries for topping
  1. I cut the brownies into about 1 inch squares to fit in the pint size mason jar. 
  2. Start with 1 layer of brownies, then top with a spoonful of syrup.
  3. Add more brownies, ice cream, and a big spoon of spring berry syrup on top. 
  4. Top with berries if desired.
  5. Devour promptly. 
Notes:  Brownies adapted from Smitten Kitchen

The End of the Spring Berry Brownie Sundae!

I love these spring berry brownie sundaes.  I might have eaten them for about a week in a row.  They would also be perfect for a cookout--everyone can make their own!  Do you have a favorite afternoon snack?  Is it practical or more indulgent?

June 3, 2014

Chili and Lime Beer Can Chicken

Chili and Lime Beer Can Chicken

I love cooking whole chickens.  They're flavorful, juicy, and normally we have leftovers to use it other things.  I love cooking a whole chicken on the grill.  It's like the roast chicken for the summer!  No hot oven, no hot house, and the clean-up is quick and easy.

Chili and Lime Beer Can Chicken Recipe

Putting a beer can in the chicken was a little silly the first time; but then I tasted it.  The beer provides a subtle flavor to the chicken, as well as keeping the chicken super moist and juicy.

Chili and Lime Beer Can Chicken with Roasted Potatoes

I veered a little away from my normal beer can chicken recipe to make this one with chili powder and lime.  The chicken itself isn't spicy, but the skin is spicy and smokey and limey and delicious!  The rub and the beer permeate the chicken and make a delicious savory flavorful chicken.

Chili and Lime Beer Can Chicken with Crispy Potatoes

And by grilling the chicken inside a pan you can cook the potatoes right underneath the chicken.  Cooking the potatoes in the chicken drippings creates a golden crispy mouthwatering crust on the potatoes.  Dustin and I both eat them out of the pan before we even get to the table.

Chili and Lime Beer Can Chicken on the Grill

Chili and Lime Beer Can Chicken
author:  Happy Food Happy Home
adapted from the Deen Brothers
serves 4

½ cup mayonnaise
1 lime, zested (about 2 teaspoons)
juice of 1 lime
2 teaspoons chili powder
1 teaspoon paprika
1/4 teaspoon cayenne
½ teaspoon salt
½ teaspoon freshly ground black pepper
1 4-5 pound whole chicken
1 12 ounce can of beer

Chili Roasted Potatoes
3-4 large potatoes
1 tablespoon olive oil
½ teaspoon chili powder
salt and pepper

1 medium disposable roasting pan
  1. Combine the mayonnaise, lime zest, lime juice, and spices in a large mixing bowl to form a paste.
  2. Rinse your chicken, check for any pin feathers, and pat dry.
  3. Place the chicken in the  mixing bowl with the mayonnaise paste and gently smother the chicken in the mixture.  Make sure to get inside the chicken as well.
  4. Dice the potatoes into medium cubes.  Toss the potatoes with the olive oil, ½ teaspoon chili powder, and salt and pepper to taste.
  5. Heat your grill to medium high heat--about 375 degrees. 
  6. Open your can of beer and drink a few sips (or pour it out) to keep the beer from overflowing.
  7. Carefully insert the can into the bottom of the chicken, keeping the beer and the chicken upright.  
  8. Place the disposable pan on the grill.  Stand the chicken in the roasting pan.
  9. Place the potatoes around the chicken in the roasting pan. 
  10. Close the grill and cook the chicken for 35-45 minutes.  Stir the potatoes once or twice.  Test for done-ness with a digital thermometer--the thigh meat should be at least 180 degrees.
  11. Carefully remove the chicken from the grill.  The beer and the can are very hot.  Allow the chicken to rest for 10 minutes.  
  12. Gently remove the beer can from the bottom of the chicken.  Carve and serve!
Chili and Lime Beer Can Chicken

The chili and lime beer can chicken is a really great recipe to make for your family.  You could also roast two at one time, and it would be perfect for a smaller cookout!

Have you ever made a beer can chicken?  What is your favorite way to cook chicken on the grill?

May 29, 2014

Spring Berry Syrup

Spring Berry Syrup

I swear for the last month every time I have gone to the grocery store I have bought a package of berries.  Strawberries, blueberries, raspberries, and blackberries.  I have celebrated spring by eating my weight in berries.

Spring Berry Syrup made with Strawberries, Raspberries, and Blueberries

Because of the plethora of berries in my fridge and a desire for waffles on Monday morning I had to make a delicious spring berry syrup.  I used strawberries, raspberries, and blueberries in my syrup, but you can totally change up the berries based on what you have and what you want your syrup to taste like.

Berry Syrup with Vanilla Ice Cream

The berry syrup is infinitely changeable too!  More berries, different berries, throw in some lime zest--whatever you want.  You can also cook down the syrup to reach a more jam-like consistency, which is what I  did with about half of my syrup. I have awesome plans for the jam--mixed into yogurt for breakfast, on top of more waffles, and of course ICE CREAM!

Spring Berry Jam made with Strawberries, Blueberries, and Raspberries

Vanilla ice cream topped with spring berry syrup is about the best thing I've eaten lately; when I've taken a break from shoving handfuls of berries in my mouth.  The spring berry flavors pop and tang when mixed with the creamy vanilla ice cream.

Spring Berry Syrup

Spring Berry Syrup
author: Happy Food Happy Home
yields about 2 cups of berry syrup
4 cups mixed berries (2 cups strawberries, 1 cup blueberries, 1 cup raspberries)
¼-½ cup sugar
¼ cup water
1-2 tablespoons lemon juice (from half a lemon)
  1. Stem the strawberries, and chop the strawberries down to roughly the size of the raspberries.
  2. Combine the strawberry pieces, raspberries, blueberries, ¼ cup sugar, water, and lemon juice in a medium sized saucepan.
  3. Cover the saucepan and heat over medium high heat until the water has started to boil.
  4. Remove lid and allow the syrup to simmer for 25-35 minutes.  The berries will burst, the mixture will get liquidy, and then start to cook down.  
  5. Taste your sauce.  If it is a little tart add extra sugar to taste.  Stir the extra sugar into the syrup and allow to dissolve. 
  6. If your syrup is too thick add some extra water, and if it is too thin allow to simmer until it is the consistency you are looking for. 
I can't stop thinking of other uses for the spring berry syrup: I want to use it as the base for Italian Sodas, I have a delicious brownie sundae in the works, and straight off a spoon mixed in with more ice cream. 

Spring Berry Syrup Over Ice Cream

Have you been buying berries buy the cart-ful?  What is your favorite way to use berries?

Related Posts Plugin for WordPress, Blogger...