September 24, 2013

Delicious Chicken in Cream Sauce


My mom and I started calling this chicken  "Delicious Chicken" soon after we made it for the first time.  The chicken highlights the best of summer tomatoes and basil, and it all blends together in a delicious cream sauce.

I will literally eat this sauce right out of the pan; the chicken drippings, broth, and cream cheese work so well together and magically create an amazing sauce with only three ingredients.


The tomatoes and basil add freshness and brighten up what could be a heavy dish.  And the tomatoes are so good softly cooked in the sauce.  They melt into puddles of tomato heaven.

Make this quickly! September is still a great time for tomatoes, but evil winter is coming fast, and we'll have to say goodbye to fresh tomatoes until next summer!


Start by pounding chicken into an even thickness--this helps it cook more evenly and stay juicier.  Then mix the salt, pepper, and flour together on a plate.  Use tongs to lightly dredge the chicken in flour and shake of the excess.


Place the chicken into the hot pan and cook until both sides are crispy and lightly browned.  Remove the chicken to a plate.


Pour in the chicken broth and use a wooden spoon to scrape the delicious chicken bits off the bottom of the pan. 


Add in the cream cheese chunks. 


Stir until melted and add salt and pepper to taste. 


Add the chicken to the sauce and turn to coat. 

  At this point you can add the tomatoes and basil and allow them to cook for about five minutes to 'melt' the tomatoes.  Or if you have picky people, leave the tomatoes and basil to garnish at the end. 


Place the chicken on the plate, spoon sauce on, and add basil...


and tomatoes! 


Delicious Chicken

4 small chicken breasts or thighs
1/4 cup flour
1 teaspoon pepper
1/2 teaspoon salt
2 glugs of oil

4 ounces (1/2 block) cream cheese
3/4 cup of chicken broth
salt and pepper to taste

1 cup fresh cherry tomatoes
a handful of fresh basil leaves

Instructions
  1. Over medium heat add oil in high sided skillet or dutch oven. 
  2. Pound chicken until about a quarter inch thick. 
  3. Mix together flour, pepper, and salt on a plate.  Dredge chicken until lightly coated in flour. 
  4. Add chicken to hot pan and cook until both sides are golden brown, and the chicken is cooked through.
  5. Remove chicken to a plate. 
  6. Add chicken broth to skillet and stir with a wooden spoon to scrape the delicious chicken bits off the bottom.
  7. Add cream cheese and stir occasionally until melted. 
  8. Cut tomatoes into quarters and julianne the basil into pretty strips. 
  9. Put the chicken back into the sauce and turn to coat. 
  10. You can add the tomatoes and basil in and cook for approx five minutes until the tomatoes have softened slightly.  
  11. OR you can plate the chicken and add the tomatoes and basil as garnish. 
And then you devour it!! Your chicken might not have as much sauce as mine do because I'm a sauce hog.  Luckily Dustin loves me and lets me eat all most of the sauce.


So please make this chicken! It is absolutely wonderful, and your taste buds will thank me!

August 26, 2013

Gray and Coral Bathroom Mood Board

I've had a lot different ideas for our half bathroom. Dark teal with a silver ceiling? Bright green like the kitchen is going to be?  Stripes?  A simple gray is what we decided to go with. We don't want it to be too much of a focal point, and the gray will make it nice and soothing.

The half bathroom is visible from both the kitchen and the living room, and it's the main bathroom our guests use while they are here. We also use it quite often--so it needs to be functional for us and guests. 

It's also currently a rather odd shade of green (most of the house was when we bought it.) It's also a room that we don't have touch up paint for. So after we patched the holes, we've been living with some pretty patched spots on the walls. It's a good look :)


I'm super excited to start this makeover! Gray paint will bring in the color we're going to paint the main walls in the living rooms. And I think the coral accents will be a fun pop of unexpected color that will give the room some interest, but won't stand out too much. 

White accessories are clean and classic, and I like that I can switch them between rooms if the mood strikes.  A few of the accessories I'm planning to DIY.  Paint swirling the vases and attempting to silver leaf a mirror frame.  Sounds like a good time to me!

What's your go to color for a small bathroom? Do you go subtle or bold?

May 15, 2013

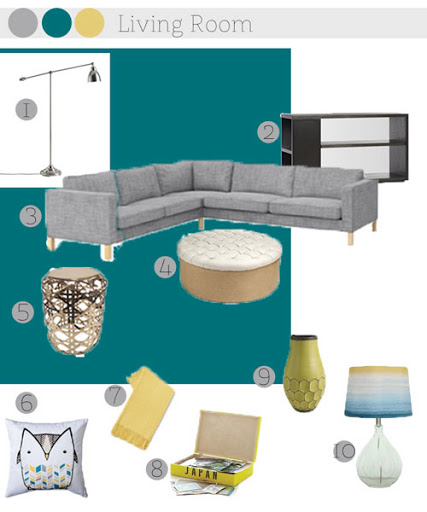
Our Living Room Mood Board

We're getting our new couch this weekend! Woo! We are starting to add permanent 'grown-up' furniture to our living room.  We're keeping photos and the tv, but are slowly working on replacing everything else.

Sometimes I feel like the blog world reveals changes too quickly. If we were to revamp this entire room at one time our budgets would be blown, and we would be exhausted. Slow and steady, right?

This mood board shows the direction we're going with the living room.  A big large couch--actually larger than the one in the picture, we're adding a chaise too--for lots of seating.  Some dark wood tones will be added in for depth with a console shelf, tv stand, and accessories.

Image Map

And of course bright shiny things! The tall floor lamp and the basket weave stool will play off of each other. Add a glass lamp and some bright, cheery yellow accessories, and I really can't wait to pull this room together.

The ottoman in the picture does not represent the colors I want to use! It's the closest image I could find to the one I have in my head :) I'm planning on building the ottoman and attaching dark wood feet to it as well. I just have to decide on a fabric!

Click here to see a Pinterest Board with all the links to the items in the mood board.  You can also click on the numbers beside the item to have them take you there.

Is anyone else redecorating their living room?  What about purchasing grown-up furniture?  Does anyone else have to have shiny things in each room?

May 2, 2013

I Heart You Maps


I knew I needed something gushy romantic to give to Dustin for our anniversary, and the Spring Pinterest Challenge brought to us by Sherry, Katie, Emily, and Renee gave me the perfect motivation.  I loved the idea of using maps to commemorate important places to us.

I saw hearts made out of maps, and while I loved the idea of using real maps, I didn't like the possibility of tracking down maps that were zoomed in enough to cut out hearts the size I wanted.


So I got creative! By using Google Maps I was able to get the places exactly where I wanted, and the resulting images were clean and modern. I loved them, and Dustin did too!

Here's the tutorial to make your own I Heart You Maps!

Supplies

  • picture frames
  • photo editing software (I used Photoshop elements)


1. Go to Google Maps and zoom in on the location you want. Use your computer to take a screen capture of the map.  Remember to make it wide and tall--you have to fit a heart onto it!
2. Save the image to your computer and open in your photo editing software.


3. In Elements create a new image the size you want (mine is 5x7).


4. Drag your map image into your blank canvas. This will create a new layer. Adjust your layer to roughly fit on the blank image. It doesn't need to fit exactly because you're going to make a heart!


5. Create a new layer. Use the custom shape tool to make a heart. Make it as big or as little as you want! 


6. Arrange the order of the layers so the heart is below your map. 
7. Select the Map layer and open the Layers Menu.  Click "Create Clipping Mask," and you will have a heart!


8. You can adjust your background color and move your map until you're satisfied with your image. Then print and frame them!


I would suggest if you're going to create multiple maps to copy the heart layer into each new image. This makes sure the heart is the same size. Or you can just replace the map layer in your original -just make sure to save each one! 


I love our heart maps! They're a great way to commemorate where we've been! They always make me happy when I look at them. So create your own heart maps!


If you made I Heart you maps where would your maps show? Where you vacationed as a family? Where you first met? Tell me in the comments!
Related Posts Plugin for WordPress, Blogger...